Why and How to setup a Blog
If you’re visiting this page for the first time you probably wondering why this Page looks so awesome compared to the another pages you visited already. That is so because I’m just started a few days ago with learning html and css programming, but I want this blog to look as beautiful as possible. So I have decided to use the free software hogo to automatically turn my Markdown files into html documents.
Why ?#
I’m sure that this is the question most of you will ask your self right now, so let me explain why I’m starting to write a blog in 2024. I mean yes nearly nobody still writes a blog and even less people start with it and I’m sure I also never had started writing one, if I hadn’t seen this Youtube Video from NetworkChuck where he is telling why he starts writing a blog. So I also wanted to do that and that brings us to the next topic.
How ?#
I would guess it’s obvious that I first tried to follow the steeps in the Video and the blog which probably works great if you also want to use Hostinger but I don’t do, I wanted to use GitHub-Pages like I use it for my main website and this guide don’t really work for GitHub-Pages. So I don’t want to lie to you it took me about two days to figure out what I have to change but I have good news for you if you also use GitHub-Pages and also want to start writing a blog you can just follow my Tutorial. It will take you only about 20-30 min.
Packages#
First of all you need the following Packages
- git
- go
- hugo
if you’re using arch linux or a arch based distro use
sudo pacman -S git
sudo pacman -S go
sudo pacman -S hugo
or if you’re using apt
sudo apt install git
sudo apt install go
sudo apt install hugo
for any another OS just do a quick google search it won’t be very complicate.
Hugo#
Hugo is the program we will use to convert our Markdown files into a website but to do that we first have to check if hugo is working fine.
hugo version
the answer should look like this:
hugo v0.139.3+extended linux/amd64 BuildDate=unknown
so now we are ready to start, first you have to move to the directory where you want to store your blog then you can type in this command:
hugo new site blog_name
cd blog_name
then you have to Install the theme you want to use by following this link in this example we will install the terminal theme wich is also the theme I’m using because terminals are awesome, I love terminals:
git init

git config --global user.name "Your Name" #paste your GitHub user name in here
git config --global user.email "your.email@example.com" #paste your GitHub Email in here
# now past the link to the submodule you have choosed in here
git submodule add -f https://github.com/panr/hugo-theme-terminal.git themes/terminal
After that you have to customize your configuration file called hugo.toml. In most cases you can just copy and paste the code you can see on the theme installation page again we will take the terminal theme as example:
it is very impotent that you paste your repo name where you blog should be hosted from in the baseurl.
baseurl = "https://repo_name/"
languageCode = "en-us"
# Add it only if you keep the theme in the `themes` directory.
# Remove it if you use the theme as a remote Hugo Module.
theme = "terminal"
paginate = 5

[params]
  # dir name of your main content (default is `content/posts`).
  # the list of set content will show up on your index page (baseurl).
  contentTypeName = "posts"

  # if you set this to 0, only submenu trigger will be visible
  showMenuItems = 2

  # show selector to switch language
  showLanguageSelector = false

  # set theme to full screen width
  fullWidthTheme = false

  # center theme with default width
  centerTheme = false

  # if your resource directory contains an image called `cover.(jpg|png|webp)`,
  # then the file will be used as a cover automatically.
  # With this option you don't have to put the `cover` param in a front-matter.
  autoCover = true

  # set post to show the last updated
  # If you use git, you can set `enableGitInfo` to `true` and then post will automatically get the last updated
  showLastUpdated = false

  # Provide a string as a prefix for the last update date. By default, it looks like this: 2020-xx-xx [Updated: 2020-xx-xx] :: Author
  # updatedDatePrefix = "Updated"

  # whether to show a page's estimated reading time
  # readingTime = false # default

  # whether to show a table of contents
  # can be overridden in a page's front-matter
  # Toc = false # default

  # set title for the table of contents
  # can be overridden in a page's front-matter
  # TocTitle = "Table of Contents" # default


[params.twitter]
  # set Twitter handles for Twitter cards
  # see https://developer.twitter.com/en/docs/tweets/optimize-with-cards/guides/getting-started#card-and-content-attribution
  # do not include @
  creator = ""
  site = ""

[languages]
  [languages.en]
    languageName = "English"
    title = "Terminal"

    [languages.en.params]
      subtitle = "A simple, retro theme for Hugo"
      owner = ""
      keywords = ""
      copyright = ""
      menuMore = "Show more"
      readMore = "Read more"
      readOtherPosts = "Read other posts"
      newerPosts = "Newer posts"
      olderPosts = "Older posts"
      missingContentMessage = "Page not found..."
      missingBackButtonLabel = "Back to home page"
      minuteReadingTime = "min read"
      words = "words"

      [languages.en.params.logo]
        logoText = "Terminal"
        logoHomeLink = "/"

      [languages.en.menu]
        [[languages.en.menu.main]]
          identifier = "about"
          name = "About"
          url = "/about"
        [[languages.en.menu.main]]
          identifier = "showcase"
          name = "Showcase"
          url = "/showcase"
now you can test hugo by usig the command
hugo server -t terminal #paste your theme name in here
now you can go into your Webbrowser and type in localhost:1313/ to see if everything is working fine.
Set up all directory’s#
So far so good, now you have to create a Markdown directory if you’re using Obsidian wich is the application I would recommend you can easily move into your Obsidian Vault and create a directory called posts.
After you have done that move back to your blog directory than move in the content directory and add also a posts directory.
Now we have just one thing left to do, we have to create a GitHub repo, wich is very easy, just go to GitHub and login into your account and create a new repo now give it a name it have to be the same you entered in the base url in the hugo.toml file. Ok now we are very far Just one thing left to do you have to clone the repo locally, if you don’t know how to do here is a guide and that’s it you’re done, now you only have to create a Markdown file in your Markdown directory and do the Boring update workflow to keep your blog up to date.
Update workflow#
Note: Below you can find three Scripts to automate those things
first you have to sync your Markdown directory (sourcepath) and your blog/content/posts/ directory by using
rsync -av --delete "sourcepath" "destinationpath"
then we have to create the html document whit:
hugo server -t terminal #paste your theme name in here
now we can sync the blog/public/ directory and the GitHub directory(destinationpath) with the following command
rsync -av "sourcepath" "destinationpath"
sourcepath have to be the path to the public folder in your blog directory.
Now we have to correct the html document’s by using the following python scripts.
import os

def replace_text_in_html(root_dir, text_to_remove, text_to_insert):
    for dirpath, dirnames, filenames in os.walk(root_dir):
        for filename in filenames:
            if filename.endswith(".html"):
                file_path = os.path.join(dirpath, filename)
                with open(file_path, 'r', encoding='utf-8') as file:
                    content = file.read()
                content = content.replace(text_to_remove, text_to_insert)
                with open(file_path, 'w', encoding='utf-8') as file:
                    file.write(content)
                print(f"text '{text_to_remove}' become '{text_to_insert}' in {file_path}.")

if __name__ == "__main__":
    root_dir = "/path/to/GitHub/directory" # paste the path to your GitHub directory in here
    text_to_remove = "https://veicm.github.io/My_Blog"
    text_to_insert = "https://user.github.io/repo" #paste user name and repo name here
    replace_text_in_html(root_dir, text_to_remove, text_to_insert)
Customize the root_dir and text_to_insert variable and save it as correct.py .
def replace_text_in_single_file(file_path, text_to_remove, text_to_insert):
    with open(file_path, 'r', encoding='utf-8') as file:
        content = file.read()
    content = content.replace(text_to_remove, text_to_insert)
    with open(file_path, 'w', encoding='utf-8') as file:
        file.write(content)
    print(f"Text '{text_to_remove}' wurde durch '{text_to_insert}' in {file_path} ersetzt.")

if __name__ == "__main__":
    file_path = "/path/to/GitHub/directory/index.html"  # paste the path to the index file in your GitHub directory in here
    text_to_remove = "/posts/"
    text_to_insert = "/repo_name/posts/"  # paste your repo name in here
    replace_text_in_single_file(file_path, text_to_remove, text_to_insert)

if __name__ == "__main__":
    file_path = "/path/to/GitHub/directory/index.html"  # paste the path to the index file in your GitHub directory
    text_to_remove = "repo_name/repo_name" #paste your repo name both time in here
    text_to_insert = "repo_name"  # paste your repo name in here
    replace_text_in_single_file(file_path, text_to_remove, text_to_insert)
Again you have to customize every variabel marked with a # whit your correct information. Now you have to save this file as correct-link.py.
So now we are ready to use the mega script wich will make it much easier for use to keep the blog up to date:
#!/bin/bash

rsync -av --delete "/path/to/markdown/directory/" "/path/to/blog/directory/content/posts/"
sleep 2
echo "source is coppied now"

cd /path/to/blog/directory/

hugo server -t terminal &
PID=$!
sleep 3
kill $PID
echo "the website was build"

rsync -av "/path/to/blog/directory/public/" "/path/to/GitHub/directory/"
sleep 3
echo "The website is coppied now"

cd /path/to/GitHub/directory/

python3 /path/to/correct.py
sleep 2
python3 /path/to/correct-link.py
sleep 2
echo "All error's are corrected now"

git add .
sleep 1
git commit -m "update"
sleep 1
git push
echo "Your blog is updated now."

cd
Edit all the path’s and save it as new_blog.sh. Now you have to make the Script able to run with:
chmod +x /path/to/new_blog.sh
and now you’re done Just execute :
./path/to/new_blog.sh
to update your blog.
Extra#
Three more tips:
Title#
add :
---
title: Why and How to setup a Blog
date: 2024-11-30
draft: false
tags:
  - tag1
  - tag2
---
on top of your Markdown files to add a title, a date and two tags.
Pictures#
Everything I showed you till now will work totally fine as long as you don’t use a picture in your blog but you probably want to, to make your blog even more awesome. So here is how you do:
First of all you have to create a few directory’s… again.
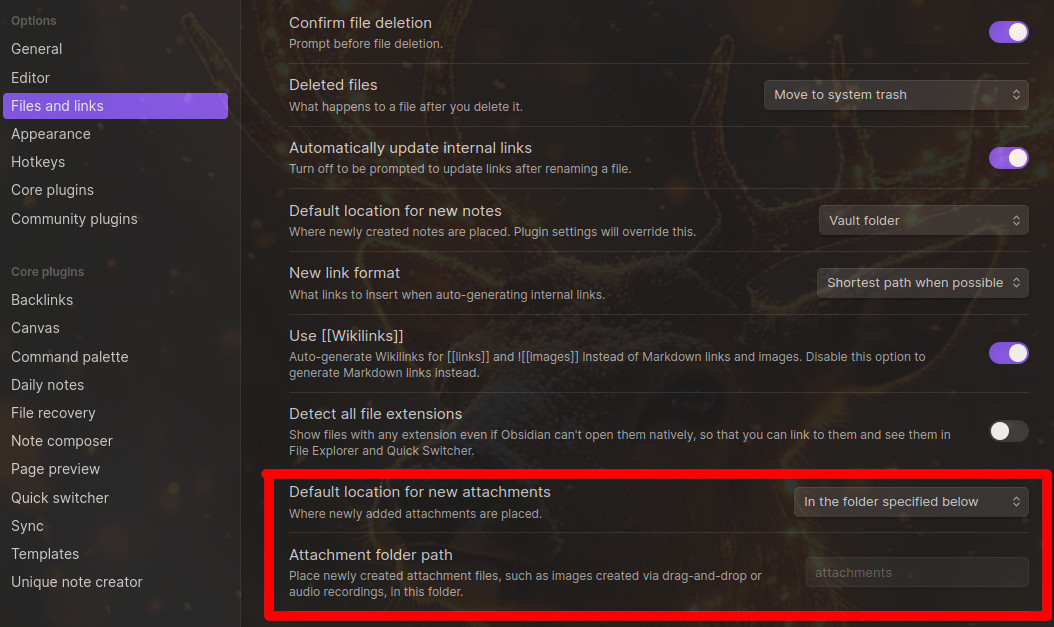
The first directory we have to create is the source directory for our pictures. If you’re using Obsidian you can simply Go into your Obsidian Vault directory a create a folder called attachments, then you have to set this directory to the default picture storage in the Obsidian settings.
 After you have done this you have to create a second directory in your GitHub directory an create an folder called
 images and that’s it, that was the last directory. Now we have to sync those two directory’s by using:
rsync -av --delete "/path/to/attachments/" "/path/to/github/images/"
and now one last thing use an other python script to make sure your blog can access the images.
You can find this script here it is called images.py, you can also find all the other scripts I showed you here.
now save this file as images.py and your done here is a updated update new_blog.sh script wich include pictures.
#!/bin/bash

rsync -av --delete "/path/to/markdown/directory/" "/path/to/blog/directory/content/posts/"
sleep 2
echo "source is coppied now"

cd /path/to/blog/directory/

hugo server -t terminal &
PID=$!
sleep 3
kill $PID
echo "the website was build"

rsync -av "/path/to/blog/directory/public/" "/path/to/GitHub/directory/"
sleep 3
echo "The website is coppied now"

cd /path/to/GitHub/directory/

python3 /path/to/correct.py
sleep 2
python3 /path/to/correct-link.py
sleep 2
echo "All error's are corrected now"

# Pictures
rsync -av --delete "/path/to/attachments/" "/path/to/github/images/"
python3 /path/to/images.py


git add .
sleep 1
git commit -m "update"
sleep 1
git push
echo "Your blog is updated now."

cd
Update Shortcut#
open your .bashrc file, if you use bash, it will be stored in your home directory and add:
alias New-Blog='/path/to/new_blog.sh'
and now you just have to type in New-Blog to execute the script instead of typing the whole path in.
Disclaimer#
- Everything I showed you in this guide will only work on unix systems wich means Mac and Linux I don’t know how to set it up on Windows.
- If I said something wrong please tell me in the GitHub issues or if you don’t understand something go to Discussion or write me personal by using the E-mail you can find here.
The Future#
I will continue writing here in any case but not regularly so the upload times and the topics I will write about will be very randomly, but I will have fun and I hope you will have too.